1. GPIO 개요
- GPIO(General Purpose Input/Output)
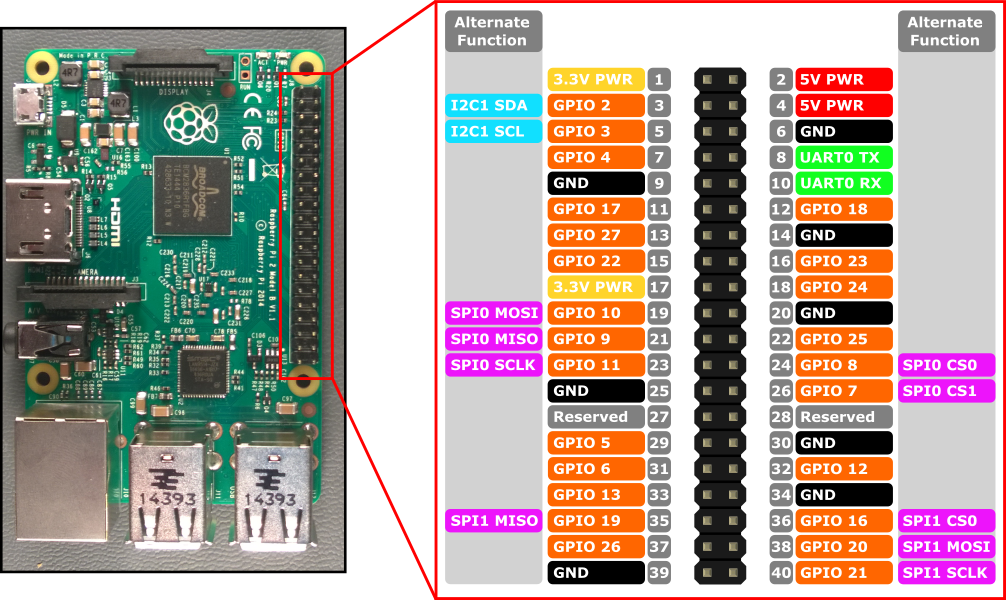
- 라즈베리파이 model A/B를 제외하고 모든 모델은 40핀 규격을 사용함
라즈베리파이 Pin Out (40핀)
2. LED로 전조등 구현하기
- 전조등 LED 제어용 GPIO 핀
- 전방 좌측: 26
- 전방 우측: 16
- 후방 좌측: 21
- 후방 우측: 20
#//file: "control_LED.py"
from gpiozero import LED
import time

led1 = LED(26)
led2 = LED(16)
led3 = LED(20)
led4 = LED(21)

try:
    while True:
        led1.on()
        led2.on()
        led3.on()
        led4.on()
        time.sleep(1.0)
        led1.off()
        led2.off()
        led3.off()
        led4.off()
        time.sleep(1.0)

except KeyboardInterrupt:
    pass

led1.off()
led2.off()
led3.off()
led4.off()
3. 버튼 입력받기
#//file: "input_Button.py"
from gpiozero import Button
import time

SW1 = Button(5, pull_up=False )
SW2 = Button(6, pull_up=False )
SW3 = Button(13, pull_up=False )
SW4 = Button(19, pull_up=False )

oldSw = [0,0,0,0]
newSw = [0,0,0,0]
cnt = [0,0,0,0]

try:
    while True:
        newSw[0] = SW1.is_pressed
        if newSw[0] != oldSw[0]:
            oldSw[0] = newSw[0]

            if newSw[0] == 1:
                cnt[0] = cnt[0] + 1
                print("SW1 click",cnt[0])

            time.sleep(0.2)

        newSw[1] = SW2.is_pressed
        if newSw[1] != oldSw[1]:
            oldSw[1] = newSw[1]

            if newSw[1] == 1:
                cnt[1] = cnt[1] + 1
                print("SW2 click",cnt[1])

            time.sleep(0.2)

        newSw[2] = SW3.is_pressed
        if newSw[2] != oldSw[2]:
            oldSw[2] = newSw[2]

            if newSw[2] == 1:
                cnt[2] = cnt[2] + 1
                print("SW3 click",cnt[2])

            time.sleep(0.2)

        newSw[3] = SW4.is_pressed
        if newSw[3] != oldSw[3]:
            oldSw[3] = newSw[3]

            if newSw[3] == 1:
                cnt[3] = cnt[3] + 1
                print("SW4 click",cnt[3])

            time.sleep(0.2)

except KeyboardInterrupt:
    pass
4. 부저로 경적기능 구현하기
#//file: "control_Buzzer.py"
from gpiozero import  TonalBuzzer,Button
import time

BUZZER = TonalBuzzer(12)
SW1 = Button(5, pull_up=False )
SW2 = Button(6, pull_up=False )
SW3 = Button(13, pull_up=False )
SW4 = Button(19, pull_up=False )

try:
    while True:
        if SW1.is_pressed == True:
            BUZZER.play(261)
        elif SW2.is_pressed == True:
            BUZZER.play(293)
        elif SW3.is_pressed == True:
            BUZZER.play(329)
        elif SW4.is_pressed == True:
            BUZZER.play(349)
        else:
            BUZZER.stop()


except KeyboardInterrupt:
    pass

BUZZER.stop()
5. 모터를 구동하여 자동차 움직이기
#//file: "control_Motor.py"
from gpiozero import DigitalOutputDevice
from gpiozero import PWMOutputDevice
import time

PWMA = PWMOutputDevice(18)
AIN1 = DigitalOutputDevice(22)
AIN2 = DigitalOutputDevice(27)

PWMB = PWMOutputDevice(23)
BIN1 = DigitalOutputDevice(25)
BIN2 = DigitalOutputDevice(24)

try:
    while True:
        AIN1.value = 0
        AIN2.value = 1
        PWMA.value = 0.5 # 0.0~1.0 speed
        BIN1.value = 0
        BIN2.value = 1
        PWMB.value = 0.5 # 0.0~1.0 speed
        time.sleep(1.0)

        AIN1.value = 0
        AIN2.value = 1
        PWMA.value = 0.0 # 0.0~1.0 speed
        BIN1.value = 0
        BIN2.value = 1
        PWMB.value = 0.0 # 0.0~1.0 speed
        time.sleep(1.0)

except KeyboardInterrupt:
    pass

PWMA.value = 0.0
PWMB.value = 0.0
6. 스위치를 입력받아 자동차 조종해보기
#//file: "sw_control_Car.py"
from gpiozero import Button
from gpiozero import DigitalOutputDevice
from gpiozero import PWMOutputDevice
import time

SW1 = Button(5, pull_up=False )
SW2 = Button(6, pull_up=False )
SW3 = Button(13, pull_up=False )
SW4 = Button(19, pull_up=False )

PWMA = PWMOutputDevice(18)
AIN1 = DigitalOutputDevice(22)
AIN2 = DigitalOutputDevice(27)

PWMB = PWMOutputDevice(23)
BIN1 = DigitalOutputDevice(25)
BIN2 = DigitalOutputDevice(24)

def motor_go(speed):
    AIN1.value = 0
    AIN2.value = 1
    PWMA.value = speed
    BIN1.value = 0
    BIN2.value = 1
    PWMB.value = speed

def motor_back(speed):
    AIN1.value = 1
    AIN2.value = 0
    PWMA.value = speed
    BIN1.value = 1
    BIN2.value = 0
    PWMB.value = speed

def motor_left(speed):
    AIN1.value = 1
    AIN2.value = 0
    PWMA.value = speed
    BIN1.value = 0
    BIN2.value = 1
    PWMB.value = speed

def motor_right(speed):
    AIN1.value = 0
    AIN2.value = 1
    PWMA.value = speed
    BIN1.value = 1
    BIN2.value = 0
    PWMB.value = speed

def motor_stop():
    AIN1.value = 0
    AIN2.value = 1
    PWMA.value = 0.0
    BIN1.value = 0
    BIN2.value = 1
    PWMB.value = 0.0

try:
    while True:
        if SW1.is_pressed == True:
            print("go")
            motor_go(0.5)
        elif SW2.is_pressed == True:
            print("right")
            motor_right(0.5)
        elif SW3.is_pressed == True:
            print("left")
            motor_left(0.5)
        elif SW4.is_pressed == True:
            print("back")
            motor_back(0.5)
        else:
            print("stop")
            motor_stop()

        time.sleep(0.1)

except KeyboardInterrupt:
    pass

PWMA.value = 0.0
PWMB.value = 0.0